According to some comments on a www.cloudynights.com web page: "... From the REVISED LIST OF TELESCOPES BY WARNER & SWASEY COMPANY AS AUGMENTED BY E. N. JENNISON FROM RECORDS IN ENGINEERING DEPARTMENT:
Unfortunately there are no more company records remaining, but Brashear's son-in-law, Jimmy McDowell did most of the actual figuring work and almost definitely figured this lens. Brashear gave credit where due and always said that McDowell was a superb lens maker. Another optician who could have had a hand in this lens was Fred Hageman, McDowell's chief assistant. Regarding the quality of this lens, the astronomers at U of Texas thought it an excellent lens. Hopefully it is still in its flint forward configurations, as Brashear lenses frequently get put in backwards after cleaning!
Arthur Otis Granger (1846-1914) was born on 14 Feb 1846 in Providence, RI. Unfortunately, his father died before Arthur was born. In 1862, at age 16, he enlisted in the Union Army, 15th Regiment Cavalry of the Pennsylvania Volunteers and he remained in the Army for the duration of the war. Eventually Private Granger became General W. T. Sherman's military secretary and confidant and became familiar with the Cartersville area while Sherman was in Kingston, Georgia, planning the infamous "March to the Sea." After the war, he married Caroline Dickerson Gregory (daughter of Henry Duval Gregory and Mary Jones) on 15 Aug 1870. Caroline was born on 28 Aug 1850 in Philadelphia, PA. They were living in Philadelphia by 1871 when they started a family; They had six children:
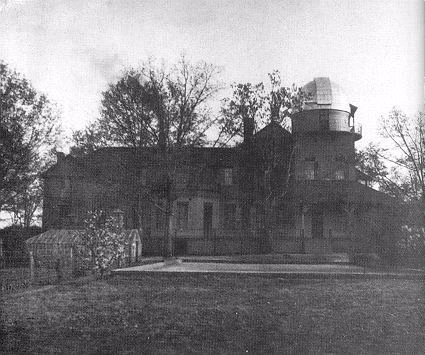
By 1883, the A.O., Granger & Co, made up of Arthur O. Granger and Joseph H. Collins, Jr., of Philadelphia, was a low-profile early subsidiary of UGI. The company installed Lowe process carbureted water gas devices. In 1889, after mining in South America, Granger finally moved to Cartersville and purchased a property located at the end of West Main Street on the crest of what is now Granger Hill. The original house was a two room structure built by James C. Young (circa 1840) and underwent a major renovation when Granger bought it. Granger continued his involvement with the mining industry and over the years enlarged his home, eventually adding an observatory. The second floor had four bedrooms, each with an arched, formal sitting room. The third floor was a gymnasium with hardwood floors. There were two staircases on the third floor, one led to the observatory and the other to a trap door to the roof. On top of the roof was a large wooden platform from which the observer had a commanding view of Cartersville. It was from this observation deck that the Grangers were inspired to call their home "Overlook." During this period, the house had three stories containing twenty-six rooms. While living in Cartersville, Arthur and Caroline contributed a great deal to the cultural development of Cartersville and to Atlanta. Granger continued to be involved in business, and was associated with patent # 779, 091 "Process of making silicofluoride of lead" [Walter Mills (A.O.Granger) (1903/1905) re:activity of silicofluorides upon lead] A. O. Granger died in 1914, in Cartersville, Georgia.. ...".
According to some deed records and some recollections of my aunt Miriam, around 1920 my grandfather Jim moved into Overlook as a tenant of Mrs. Caroline D. G. Granger. Overlook is described in the book Images of America, Bartow County, Georgia, by Michele Rodgers (Arcadia 1996): "A. O. Granger served with General William Tecumseh Sherman during the War Between the States and camped on this property while traveling with the army. At that time only a small cabin stood on this hilltop. A number of years after the war Granger chose to relocate his family to Cartersville and purchased the property he had visited years before as a soldier. Though the cabin had been expanded during the intervening years, it did not suit the needs of the Grangers, so they made extensive additions to it.
According to Historic Bartow County, Circa 1828-1866, by the Etowah Valley Historical Society (1981), Overlook was "... Begun as two rooms, circa 1857, by James C. Young ... A story has it that after the war, the Grangers invited guests to a party in honor of Sherman on a return trip to the South. None of the invited guests attended. ...".
Here
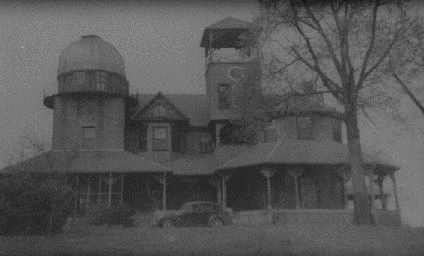
is a photo of the front of Overlook.
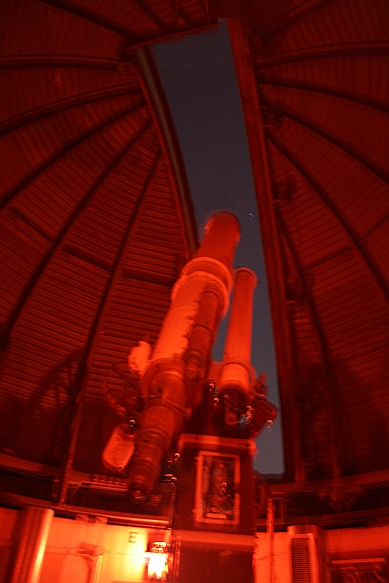
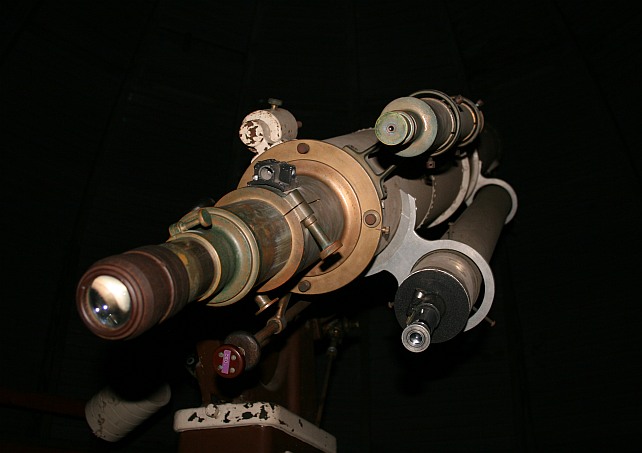
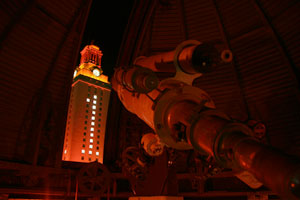
According to some comments on a www.cloudynights.com web page: "... A 9" Warner & Swasey with a Brashear lens is installed at University of Texas, Austin TX - Painter Hall in 1932. Feng Ma, of the UT Astronomy Department wrote, "The image quality is superb, much better than a 16" reflector built in 1960's. The clock drive is weight driven, and needs to be manually rewound." And further, "About this telescope, I have heard rumors that it belonged to a circus, which carried the telescope around while showing people the stars. Then UT bought it from the circus around 1932." From a newspaper article in 1952, "The observatory is manned by students and faculty of the Department of Applied Mathematics and Astronomy. It was built in 1932 after a long campaign on the part of Dr. H. Y. Benedict, former president, of the University, at a cost of $15,000. Since then other large amounts have been spent on new equipment and repairs for it." Daily Texan, 11/27/52 Regarding the earlier origin of the telescope, Ms. Lara Eakins, a UT Astronomy staff member, wrote "I don't know a whole lot about the history of the telescope, but I know that the lens was originally made in 1905 ...". [1905 should be1902, see above]
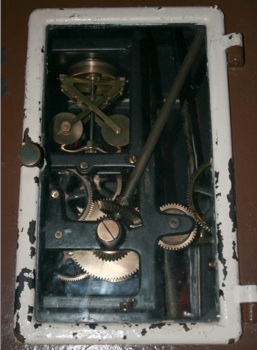
According to a web page related to the University of Texas: "... The 9-inch telescope has a long history with the University. The lens in the telescope is actually older than the tube, mount and dome and was ground a little before the turn of the 20th century by the John A. Brashear company -- one of the finest lens makers of the time. The tube and mount were made by the Warner and Swasey Company of Cleveland and was placed in Painter Hall when the building was constructed in the early 1930s. The dome appears green from the outside because of its high copper content, which oxidizes to a patina similar the color seen on the Statue of Liberty. The inside has been painted but in areas where the paint has chipped, the brilliant original copper can be glimpsed. Unlike most modern telescopes, no electricity is required to operate the clock drive on the telescope. Instead, the drive is wound up to raise a weight which will drop throughout the evening and turn the drive gears. ...".
According to web pages related to the University of Texas:
"... OBSERVATORY LOCATIONThe Observatory is located on top of T.S. Painter Hall on 24th street. The dome can be seen on the top of the building from the street. Take the southwest stairway up to the 5th floor and then follow the signs. Unlock the doors and inside the room, immediately to your right are two light switches. Adjust the brightness of the lights with the white knob (turned completely clockwise for dimming).
OPENING PROCEDURE
A. Removing the dust cover
The dust cover is located on the front lens of the telescope. Be sure the RA is unlocked and the declination is unlocked. Using the wheel on the pier, move the telescope in RA so that the weight moves until it is very nearly level with the telescope. Lock the RA, unlock the declination and move the front of the telescope down far enough so that you can reach the dust cover (be sure not to touch the lens). Remove the dust cover.
B. The Clock Drive
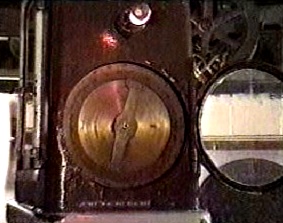
Inside the glass door on the west side of the pier is the clock drive mechanism. This drive compensates for the Earth's rotation and tracks the star you wish to observe automatically. The telescope is driven by a weight which slowly falls inside the pier. To wind the clock drive, turn the crank in the clockwise direction until you meet some resistance. Don't go any farther. Before you start observing, always check to be sure that the drive is fully wound.
To turn the clock drive on, push the switch on top of the mechanism from left to right. REWIND THE CLOCK DRIVE EVERY HOUR.
The clock drive is turned off by pushing the switch from right to left.
C. Opening the Dome Slit
To open the dome slit, first pull on the cable to the left of the pulley. This will unlock the slit. Then pull on the rope to the right side of the pulley and open the slit completely. Remember to re-hook the rope after opening the slit.
D. Turning the Dome
The wheel in the northwest corner of the observatory is used to turn the dome slit to whatever section of the sky you want to observe. To avoid breaking the lights in the dome, hook the slit rope on the hook to the left of the slit. Sometimes the dome will not rotate when you turn the wheel. You can usually correct this by rocking the wheel back and forth a few times. If this is not successful, close up and contact the observatory director as soon as possibly.
TELESCOPE CONTROLS
A. Right Ascension controls
There are two shafts which run parallel to the telescope. The one that has two black knobs holds the right ascension controls. The outer black knob is the right ascension (RA) lock. In the dark, you can distinguish this knob by the grooves which are located along its edge like the serrations on a quarter. The inner knob is the RA slow motion, which you can use to center a star in the field of the 9-inch. The big wheel on the north side of the pier turns the telescope in RA only. When turning the telescope with this wheel you should be sure that the RA is unlocked and that the declination is locked.
B. Declination Controls
The outer knob on the other shaft is the declination lock. The edge of this knob is smooth so that you can distinguish it from the RA lock in the dark. The inner knob is the declination slow motion
C. Moving the Telescope
Is strongly advised that when you are moving the telescope though any large angle, you move it in one coordinate at a time and have the other one locked. Be careful not to hit the pier or the ladder while moving the telescope.
D. Counterweights
The counterweights should never be allowed to get higher than the pier; this means they should never be allowed to get above horizontal. You can check that this never occurs by monitoring the hour angle circle- the counterweights will be horizontal (even with the pier) when the hour angle reads either 12 or 24 hours. Typically, you will find the counterweights are about to go above horizontal if you move the telescope from the east to the west (or vice versa) without raising the counterweights above the pier. In such an instance, move the telescope in declination to 90 degrees. Then, you may move the telescope in RA until the counterweights are on the other side of the pier (which should now be close to the desired RA) and reset the declination to the required value. If you fail to observe this precaution, you may damage the telescope by running it into the pier.
** Do not use force on any of the telescope controls. This can damage the telescope. **
TELESCOPE OPERATION
A. Setting the telescope
After you have opened up, you will be ready to observe. You must start by setting the right ascension circle. Just as any place on earth can be defined in terms of its latitude and longitude, the position of any astronomical object can be specified by its right ascension (celestial longitude) and its declination (celestial latitude).
The RA dial has to be set each night and whenever the clock drive has been shut off. The dial is located on the north side of the pier, just above eye level.
To set the RA dial, pick an object whose coordinates are known, set the telescope on that object and then set the dial so that it reads the correct RA for the objects at which the telescope is pointed. On the wall beside the blackboard is a list of four bright stars and their coordinates. At any time of the year, at least one of these stars will be in the evening sky. They are:
- Vega ---- Summer, Fall
- Betelgeuse ---- Winter, Spring
- Sirius ---- Winter, Spring
You should check the RA dial occasionally when you move to a new object.
Also, remember that since the declination circle does not need adjusting, it is possible to use it to help find bright stars and planets. Merely turn the telescope to the proper declination, then sweep in RA until the star is found.
You can now use the setting circles to find any object whose coordinates are known and which is bright enough to be seen through the telescope (assuming that the clock drive was on when you set the RA dial). For example, suppose you wish to look at Beta Cygni, a double star.
You would proceed as follows:
- 1. Look up Beta Cygni's coordinates (19h 27m, +27d 45').
- 2. Unlock the RA and move the telescope until it reads 19h 27m.
- 3. Relock the RA
- 4. Unlock the declination and move it until it reads 27 degrees 45'.
- 5. Lock the declination. The star should be in the view finder.
A book which lists many interesting objects and their coordinates is Norton's Sky Atlas, a copy of which is kept in the observatory.
B. Locating the Star in the View Finder
Move the telescope over all large angles in one coordinate at a time, with the other coordinate locked, until the telescope is pointing approximately toward the object. You may then unlock both at once and align the telescope with the star and center it in the telescope.
C. Selecting an Eyepiece
The Erfle eyepiece affords a wide field of view and should be used first, so that you can center the star in the nine inch. Once this is done, you may wish to use a high power eyepiece. These may be obtained from the cabinet in the west part of the observatory. First, unscrew the Erfle from the telescope. Then screw the eyepiece mounted in the adapter into place. The power of each eyepiece is listed on a chart above the eyepiece cabinet. Also, for more easily accessible viewing, the diagonal can be inserted into the adapter first. The image of the object is focused with one of the two black focusing knobs located above the eyepiece of the nine-inch. The bronze knob is the focusing lock, and should be unlocked before you attempt to focus the star in. When the star is in focus (i.e., appears least diffuse), you may relock the focus. Camera adapters for prime focus pictures are also available in the cabinet.
TELESCOPE LIGHTS
A box is located on the north side of the pier contains the switched for the lights on the RA circle, the declination circle, and the hour angle circle. Throw the toggle switch to the right and push the appropriate buttons.
CLOSING PROCEDURES
The following procedures MUST be followed in closing the observatory. FAILURE TO DO SO MAY RESULT IN LOSS OF OBSERVING PRIVILEGES.
- 1. Replace the dust cover on the telescope. Use a procedure similar to the one used in removing it.
- 2. Turn the telescope lights off by throwing the toggle switch to the left.
- 3. TURN THE CLOCK DRIVE OFF AND REWIND FULLY. This step is of extreme importance.
- 4. CLOSE THE SLIT AND LOCK IT. Turn the dome until the slit is facing the E (that way the slit can be seen from the astronomy dept. to check whether it's open or closed). The wheel should then be over the door. Make sure the rope is on the hook.
- 5. Put the Erfle eyepiece on the telescope.
- 6. Point the telescope towards Polaris (declination = 90 degrees)
- 7. Lock the declination.
- 8. Unlock the RA and move the telescope until the counterweights are aligned with the north side of the pier. They should be pointing straight down. LEAVE THE RA UNLOCKED.
- 9. Clean the room.
- 10. Sign the log book.
- 11. Turn off the lights and lock the door. Be sure to check that the door is locked before leaving.
This close up procedure is listed in the observatory. Read this list through to be sure that you will have done everything correctly before you leave.
OTHER
Finally, here are some closing reminders on what not to do when using the telescope. These remarks are also found above the eyepiece cabinet in the observatory.
- 1. Don't attempt to fix the telescope if anything goes wrong; if you need help, get it from the observatory director or from a graduate student in the astronomy department.
- 2. Don't try to move the telescope in a direction when that direction's lock is engaged. This is one of the most common ways to damage the telescope.
- 3. Don't allow the counterweights above the main body of the telescope.
- 4. Don't turn the RA and declination knobs until you're blue in the face; once they're unlocked, they're unlocked, you need not turn them anymore.
- 5. Handle the eyepieces carefully; don't drop them or get fingerprints on them.
- 6. Don't touch or attempt to clean any of the lenses' surfaces, especially the main telescope lens.
SIGN-UP SHEET
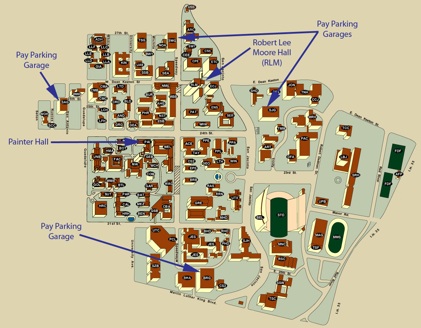
The sign-up sheet is located on the bulletin board around the corner from RLM 13.122. Sign up for the telescope several days in advance so as to be fairly certain of observing on the night desired.
You may sign up for any period except for those which are marked PUBLIC NIGHT. There are generally three periods for observing on any given night:
- A: 8 - 11 pm
- B: 11 - 2 am
- C: 2 - 6am
When signing up for a certain period, write down your name and phone number on the sign-up sheet. Do not sign up for more than two observing periods in a week.
KEY PROCEDURE
The procedure outlined here is for students using the standard set of keys. These will be known as "standard observers". Non-standard key sets are those used by special arrangement with the department. Holders of non-standard sets will identify their status by writing "own keys" on the sign-up sheet, and therefore are to be excluded from the key transfer procedure. In what follows, the "observer" will only refer to students using the standard key set.
The "first observer" is responsible for picking up the keys to the observatory. The keys may be obtained in RLM 13.122 before 4pm on the day you are scheduled to observe. The "first observer" is the first person to observe on an evening or a weekend that uses the standard key set. This does not include other (non-standard) observers or the observatory director, who has a personal set. Do not depend on the observatory director to let you in on the public nights. The "first observer" should pick up the keys even if it is cloudy, or even if he won't observe so that he can pass on the keys to the next observer. The keys are transferred from one observer to the next one. It is strongly recommended that each observer make arrangements with the next observer to transfer the keys. The last observer on a week night, or at the end of a weekend, must return the keys to RLM 13.122 by noon the following day. Key transfer is totally the responsibility of the observers. ...".
Further, there are instructional videos about operating the telescope on the web here (50 MB) and here (16 MB).
Here, from some of the web sources mentioned above, are some images of the telescope:


......